Author Archives: sethjust

GPSDrive on OS X

After getting GPSd to compile on OS X, I set my sights on GPSDrive, an open source navigation and map viewing program. When I posted about GPS a couple years ago, I installed GPSDrive, using the version from Fink. However, the latest version of GPSDrive on Fink nowadays is 2.08pre12, while the latest stable release is 2.11. I’ve also moved away from using Fink and/or MacPorts for package management in favor of Homebrew.

To get GPSDrive running I had to do a little bit of fiddling, but it’s fairly easy. First off, I needed to downgrade GPSd from 2.96 to 2.95 — apparently the newest version introduced slight changes to the library that GPSDrive hasn’t yet picked up. However, building the two versions is exactly the same — see my post on building 2.96 for instructions that apply to 2.95. You can get the source package for either version here.

Next I used homebrew to install the dependencies that GPSDrive needs by running brew install gtk+ cairo gtkglext postgresql gettext. Note that these are just the packages I didn’t have going into the build — you may need more, depending on your setup.

With preliminaries out of the way, I downloaded gpsdrive-2.11 from here. As per their build instructions I created a build directory (mkdir build), moved into it (cd build), and then ran cmake. After some serious wrestling with dependency locations and linker flags I figured out the following two steps to get GPSDrive to compile and build.

First, because GPSDrive seems to want to automatically link against libcrypt, which OS X bundles in it’s libc, you need to tell cmake not to use it. I couldn’t figure out how to do with with a cmake configuration option, so I edited gpsrive-2.11/src/CMakeLists.txt and commented out (put a # in front) of the two lines containing the word “crypt”. You could also delete these lines — it has the same effect. This is along the lines of the patch here (see the attachment), that was posted to the GPSDrive mailing list last year, when I pointed out this bug. Sadly, the patch has not been applied to the source tree yet, but I can attest it works, if you care to apply it yourself.

With that out of the way, we can now run the following command from inside the build directory.

cmake -DCMAKE_BUILD_TYPE=Debug\
 -DWITH_FRIENDSD=OFF\
 -DWITH_KISMET=OFF\
 -DWITH_MAPNIK=OFF\
 -DWITH_POSTGIS=OFF\
 -DWITH_SPEECH=OFF\
 -DLIBGPS_OLD=OFF\
 -DGTK2_ATK_INCLUDE_PATH=/usr/local/Cellar/atk/2.0.0/include/atk-1.0\
 -DGTK2_GLIBCONFIG_INCLUDE_PATH=/usr/local/lib/glib-2.0/include\
 -DGTK2_GLIB_INCLUDE_PATH=/usr/local/include/glib-2.0\
 -DGTK2_PANGO_INCLUDE_PATH=/usr/local/Cellar/pango/1.28.4/include/pango-1.0\
 -DGTK2_CAIRO_INCLUDE_PATH=/usr/local/Cellar/cairo/1.10.2/include/cairo\
 -DGTK2_GDKCONFIG_INCLUDE_PATH=/usr/local/Cellar/gtk+/2.24.4/lib/gtk-2.0/include\
 -DGTK2_GTK_LIBRARY=/usr/local/lib/libgtk-x11-2.0.0.dylib\
 -DCMAKE_C_FLAGS="-I/usr/local/Cellar/gdk-pixbuf/2.22.1/include/gdk-pixbuf-2.0"\
 -DCMAKE_EXE_LINKER_FLAGS="-lgdk_pixbuf-2.0.0 -lpango-1.0.0 -lgobject-2.0.0 -L/usr/local/Cellar/gettext/0.18.1.1/lib -lintl"\
 -DMSGFMT_EXECUTABLE=/usr/local/Cellar/gettext/0.18.1.1/bin/msgfmt\
 ..

After cmake generates all the necessary files, you can run make, and assuming it doesn’t give you errors, ./src/gpsdrive will allow you to test your newly built executable, and sudo make install will install it.

Once GPSDrive is up and running you should be able to see your current location (assuming you have a GPS connected to GPSd). If you want to get maps, you can download them from within GPSDrive, which has support for OpenStreeMap tiles, as well as NASA Landsat images (although I haven’t been able to get Landsat to download correctly).

Sign your email like Randall Waterhouse

Neal Stephenson’s novel Cryptonomicon is a fascinating book; I’m re-reading it for the umpteenth time and loving it every bit as much as when I first read it in 7th grade. One thing that caught my attention on this reading (especially in light of my recent GPS post) is the way that one of the main characters, Randall Lawrence Waterhouse, signs his email:

Randall Lawrence Waterhouse

Current meatspace coordinates, hot from the GPS receiver card in my laptop:

8 degrees, 52.33 minutes N latitude 117 degrees, 42.75 minutes E longitude

Nearest geographical feature: Palawan, the Philippines

(from http://www.euskalnet.net/larraorma/crypto/slide51.html)

Using GPSd’s python bindings, and the free, CC-licenced RESTful API from GeoNames.org, I wrote a short python script that will produce a similar output:

Seth Just

Current meatspace coordinates, hot from the GPS receiver card in my laptop:

41.751 N latitude, 111.807 W longitude

Nearest geographical feature: Logan Canyon, Utah, United States

The core of the script is two functions — one that gets GPS coordinates from GPSd, and a second that does a lookup for geographical features (mountains, canyons, islands, etc) on GeoNames.org. For more details, see the final section of this post.

Using gpssig.py

To use gpssig.py, first download it from here, and change the extension to .py.

In order to be useful as an email signature, I had to produce output in HTML format, which allows almost any mail client to use the output as a signature. I’ve gone through the effort of setting it up with the two clients I use the most: Mozilla Thunderbird and Apple’s Mail.app. Of these two, Thunderbird has documented support for HTML signatures (see here for details), and should be the most like other email clients. This script has been tested on Mac OS X Snow Leopard, and should run on Linux without problems (although I haven’t tried it on versions of python higher than 2.6.1).

Using gpssig.py takes two steps: first configure your Mail client to take a signature from a file, and then configure gpssig.py to run automatically to update that file.

Thunderbird is relatively easy to set up with an HTML signature. Because it only supports one signature per account, you simply need to tell it to draw that signature from a file. Under each account’s settings there’s an option to “Attach the signature from a file” (see here for a detailed howto). I chose to use ~/.signature.html, but you can use any file you’d like to, just remember the location you choose.

Mail.app is a more finicky beast — although the script supports it, I recommend using Thunderbird, mainly because Mail only refreshes its signatures from files on every launch, whereas Thunderbird will read the file each time you compose a message. However, if that limitation is acceptable (if you don’t move very much, perhaps), it will work just fine. The main issue with Mail.app is that it doesn’t store signatures in an HTML file, but instead in the proprietary .webarchive format. These files can be found in ~/Library/Mail/Signatures. To use gpssig.py with Mail, you need to follow steps 4&5 from http://bytes.com/topic/macosx/insights/825900-setup-html-signatures-apple-mail-mail-app. First create a new signature (under Preferences->Signatures). This will create a new file in the signature folder — take note of the file name. You will use this file name to configure gpssig.py.

gpssig.py is configured with command line options:

Usage: gpssig.py [options] NAME FILENAME
Note: NAME should be enclosed in quotes, unless it contains no spaces.

Options:
  -h, --help   show this help message and exit
  --no-gps     don't attempt to get coordinates from GPS
  -a, --amail  generate files for Apple's Mail.app (.webarchive)
  --lat=LAT    default latitude, if GPS is unavailable
  --lon=LON    default longitude, if GPS is unavailable

The simplest way to use it is manually — simply running it whenever you want to update your signature. For example, I use ./gpssig.py –lat=41.752 –lon=-111.793 ‘Seth Just’ ~/.signature.html to generate a signature for Thunderbird.

If you want to make this automatic, you’ll need to have the script run automatically. On OS X you’ll need to use launchd, while on linux you need cron. Both of these make setting up repeating actions very easy — see here for information on launchd and here for information on cron.

Sadly I haven’t yet figured out a way to run the script whenever you write an email — if I figure it out, I’ll be sure to post something.

The Script

gpssig.py is built around three major functions — one gets coordinates from GPSd, one gets geographical feature information from

The function I use to get GPS information is a bit hacky — there doesn’t seem to be terribly much documentation on GPSd’s python bindings, so I made do with what I could figure out:

class NoGPSError (Exception): pass

def get_lat_lon():
  # GPSd Python bindings
  import gps

  # Create GPS object
  session = gps.gps()

  # Set GPS object as an iterator over reports from GPSd
  session.stream(gps.WATCH_ENABLE|gps.WATCH_NEWSTYLE)

  # Loop until we get a report with lat and lon. The limit of 5 loops should be more than enough -- my gps never takes more than three when it has a lock
  i = 0
  while (1):
    try:
      session.next()
      lat, lon = session.data['lat'], session.data['lon']
      break
    except:
      if (i > 5): raise NoGPSError 
      i += 1

  return lat, lon

The other function is more straightforward — it makes two http requests to GeoNames.org to get the nearest geographical feature and locality. It then combines those responses in a way that should provide a good response almost anywhere in the world (provided that GeoNames has good, local data). I’ve tested it with a variety of coordinates (provided by http://www.getlatlon.com/), and the responses seem to be pretty good.

def get_geo_string(lat, lon):
  # Modules for REST/XML request from GeoNames
  import urllib
  from xml.etree import ElementTree as ET
  
  # Request the name of the nearest geographical feature
  placename = ET.parse(
      urllib.urlopen("http://api.geonames.org/findNearby?lat=" + str(lat) + "&lng=" + str(lon) + "&featureClass=T&username=sethjust")
      )
  subdiv = ET.parse(
      urllib.urlopen("http://api.geonames.org/countrySubdivision?lat=" + str(lat) + "&lng=" + str(lon) + "&username=sethjust")
      )
  
  # Format and return place, region, country
  try:
    country = subdiv.getiterator("countryName")[0].text
  except:
    try:
      country = placename.getiterator("countryName")[0].text
    except:
      country = ''
  try:
    region = subdiv.getiterator("adminName1")[0].text
  except:
    region = ''
  try:
    name = placename.getiterator("name")[0].text
  except:
    name = ''
  
  if country:
    if region:
      if name:
        result = "%s, %s, %s" % (name, region, country)
      else:
        result = "%s, %s" % (region, country)
    else:
      if name:
        result = "%s, %s" % (name, country)
      else:
        result = country
  else:
    result = "unknown"
  
  return result

Finally, the main method of the program parses arguments, determines what coordinates to use, gets the geographical feature string, and then generates the proper HTML and copies it into the correct place.

if (__name__ == "__main__"):
  # Parse command line options
  from optparse import OptionParser
  parser = OptionParser("Usage: %prog [options] NAME FILENAME\nNote: NAME should be enclosed in quotes, unless it contains no spaces.")
  parser.add_option("--no-gps", action="store_true", dest="nogps", default=False, help="don't attempt to get coordinates from GPS")
  parser.add_option("-a", "--amail", action="store_true", dest="amail", default=False, help="generate files for Apple's Mail.app (.webarchive)")
  parser.add_option("--lat", action="store", type="float", dest="lat", help="default latitude, if GPS is unavailable")
  parser.add_option("--lon", action="store", type="float", dest="lon", help="default longitude, if GPS is unavailable")

  options, args = parser.parse_args()
  
  try: assert(len(args) == 2)
  except AssertionError:
    print "You must provide NAME FILENAME\n"
    parser.print_help()
    exit()

  try: assert(((options.lat!=None) & (options.lon!=None)) | ((options.lat==None) & (options.lon==None)))
  except AssertionError:
    print "You must provide both lat and lon arguments\n"
    parser.print_help()
    exit()

  # Modules for creating signature file
  import tempfile, os

  try:
    if (options.nogps): raise NoGPSError
    lat, lon = get_lat_lon()
    print "Got %f, %f from gps" % (lat, lon)
  except NoGPSError:
    if (not options.nogps): print "Failed to get coordinates from GPS"
    try:
      assert((options.lat!=None) & (options.lon!=None))
    except AssertionError:
      print "No default coordinates provided; exiting"
      exit()
    lat, lon = options.lat, options.lon
    print "Using %f, %f as coordinates" % (lat, lon)

  geostring = get_geo_string(lat, lon)

  lac, loc = 'N', 'E'
  if lat \n

") file.write(args[0]) file.write("

\n

") file.write("Current meatspace coordinates, hot from the GPS receiver card in my laptop:") file.write("

\n

") file.write("%.3f %s latitude, %.3f %s longitude" % (lat, lac, lon, loc)) file.write("

\n

") file.write("Nearest geographical feature: " + geostring) file.write("

\n") file.write("\n") file.flush() if (options.amail): os.system("textutil -convert webarchive -output " + args[1] + " " + file.name) else: os.system("cp " + file.name + " " + args[1])

GPSd under OS X (revisited)

It’s been almost 2 and half years since I originally posted about GPSd and OS X. That post got quite a bit of traffic for a while, but a whole lot has changed since then. If you’re interested in some in-depth background information, you should check out the old post; this post is mostly about the changes in the GPSd project since then, and the process of getting it running on OS X.

Two and a half years ago, GPSd had just released version 2.38. The latest version, which I just downloaded, is 2.96. Most significantly, GPSd has updated their communication protocol from a simple character-command format to one based on JSON-packed data. Further, they’ve built a significant portion of the project around python, and consequently built better python interfaces into the project.

OS X has also been updated, from whatever 10.5.x was current three Januaries ago, to 10.6.8. Luckily, the under-the-hood changes that Snow Leopard brought to the table should only make compiling software easier.

Building GPSd is a whole lot easier than it was the last time I went through all of this. I downloaded the latest source package (from http://prdownload.berlios.de/gpsd/gpsd-2.96bis.tar.gz). The bundled INSTALL file lists only python and py-gtk2 as dependencies, which makes compilation easy, given that python comes bundled with OS X. Although py-gtk2 is available through MacPorts (using sudo port install py-gtk2) I chose to avoid install the ridiculously long list of dependencies that it requires, as it is only required for the graphical test client (xgps), and GPSd also ships the perfectly functional command-line tool cgps, which provides the same information, albeit in a more sparse manner.

The actual build process is surprisingly easy: I ran ./configure –x-includes=/usr/X11R6/include, as suggested by the INSTALL file. As this indicated no issues, I ran make and sudo make install, which ran without a hitch, and gave me a working set of gps tools.

At this point it is possible for me to attach my GPS (see my old post for information about getting devices up and running), run gpsd -n /dev/cu.usbserial, and then use cgpsto get coordinates, date, and satellite information. However, this isn’t everything — all of the python based GPSd tools, such as gpsprof, still don’t work. This is because of Apple’s slightly special python distribution — while GPSd’s sudo make install puts python modules into /usr/local/lib/python2.6/site-packages/, they need to be in /Library/Python/2.6/site-packages/. Instead of having to install these manually, you can use the bundled python install script to put the modules in the correct path by running sudo python setup.py install (thanks to http://docs.python.org/install/index.html).

Now that I have the most recent GPSd up and running I’m hoping to do some fun things with it. If I do, you’ll see it here!

Web Laundry, Smart Cards, Python and OS X Smorgasbord

Disclaimer: This article is for informational purposes, the author shall not be held liable for any actions taken on the basis of the information presented. I do not condone fraud, theft, or other malfeasance.

In September 2010, posted an article about the insecurity of the stored-value smart card system used by Web Laundry (now Wash Laundry). I’ll let that article stand on its own — it gives a good overview of the bone-headed system that the engineers there had in place. In short, they used a secure memory card made by Atmel (specifically, from the CryptoMemory line), the AT88SC0404C (datasheet here), but neglected to change the default master password. This means that all you need to read or write the stored data is a ISO-7816-3 compliant smart card reader.

This is where my story starts — this summer I’m living in a dorm that uses a Web Laundry stored value system. That was enough of a push for me to buy a smart card reader, seeing as I’d always wanted to play with them, and this looked like a good opportunity. I picked up a smart card reader from Amazon.com, an SCM Microsystems SCR3310. It was both cheap and, according to the manufacturer’s product page, offers full ISO 7816, CCID and PC/SC compatibility (i.e. all of the relevant standards), as well as drivers for OS X, which is my primary operating system for the time being.

Doing some research, it turns out that Apple ships a (modified) version of the open-source PCSC Lite framework for smart card integration. This means that all I would need to get up and running was a driver for my device and a way to interface it. Once the reader arrived I installed the drivers, and ran pcsctest (from PCSC Lite) on the command line. Sadly, all I got was an error message:

Testing SCardEstablishContext    : Service not available.

Googling told me that the appropriate services are supposed to start whenever a smart card reader with appropriate drivers is plugged in, which made this error all the more confusing. Luckily, I found this thread on SCM’s forums — it seems that the driver they have posted doesn’t include the USB identifiers for the version of the reader I had, but a helpful poster left instructions to modify a plist file in the driver (mirrored here for archival purposes). With that, I was up and running!

pcsctest spat out useful output this time around:

$ pcsctest

MUSCLE PC/SC Lite Test Program

Testing SCardEstablishContext    : Command successful.
Testing SCardGetStatusChange
Please insert a working reader   : Command successful.
Testing SCardListReaders         : Command successful.
Reader 01: SCM SCR 3310 00 00
Enter the reader number          : 1
Waiting for card insertion
                                 : Command successful.
Testing SCardConnect             : Command successful.
Testing SCardStatus              : Command successful.
Current Reader Name              : SCM SCR 3310 00 00
Current Reader State             : 0x34
Current Reader Protocol          : 0x0
Current Reader ATR Size          : 8 (0x8)
Current Reader ATR Value         : 3B B2 11 00 10 80 00 04
Testing SCardDisconnect          : Command successful.
Testing SCardReleaseContext      : Command successful.

That left me with the issue of interacting with the smart card somehow. In case you hadn’t guessed from the post title, that solution was Python. Specifically, the pyscard bindings for PCSC Lite, from pyscard.sourceforge.net. There’s a nice array of examples, and so I wrote up a python script for interacting with this particular CryptoMemory card, based on the command set from the datasheet and the examples. It’s not as polished or feature-rich as the software Hans posted, but if you’re running OS X or Linux, it should be helpful. At the moment this script is extremely rough — it gets the job done, but in an ugly and unsafe way. I’m posting it here, but you SHOULD NOT USE IT IF YOU DON’T KNOW WHAT YOU’RE DOING. If you aren’t careful, it will mess up your card. Hopefully I’ll have time to wrap it all in a library that will abstract away the messiness and provide nice features like exception handling; if I do, you’ll see it here.

Using my script I was able to verify Hans’ findings — although the card is configured to require cryptographic authentication to access the user zones (where the goodies can be found), the password is left at the default value, which makes overwriting the access registers and conducting a replay attack (as demonstrated by the video in his post) a walk in the park. Following his example, I won’t post any information on how the cards store their values, but it’s surprising that this security hole still isn’t fixed, seeing as it would cost nothing to overwrite the master password when they first configure the cards.

Hopefully this post will give some of you who’ve wanted to work with smart cards a push in that direction — although there are a few hurdles along the way, it’s an interesting area to work on. I’m hoping to move on from poking at other people’s cards and start using my new hardware for authentication and encryption.

Happy hacking!

RGB LED Sun with Rainbowduino

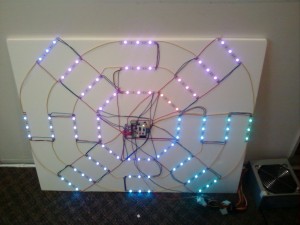
So my current project (outside of massive amounts of school work) is building a large, bright, RGB LED display for my college’s weekend-long end-of-year party. I’ve got three of these strips from DealExtreme, which have 30 RGB LEDs in separable strips of three LEDs. That makes for a total of 30 RGB dots, which is presents no problem for a Rainbowduino.

My goal for this post is to record my process in putting this project together. I’m nowhere near done at the moment, but I’ll keep updating it as I go.

Planning

The plan for this project came together slowly – I knew that I wanted to make a large RGB LED display, and I had already bought one light strip to play with a year or so ago. I’m not sure how the Rainbowduino came across my radar, but it seemed perfect, because it could drive up to 64 RGB LEDs simultaneously, so could support up to 6 strips. However, the funding for the project chose to use 3, and I felt that that was more than enough to get the effect I was shooting for.

Because the strips run at 12 volts, and are each rated for 6 amps, I decided to use a spare PC power supply to provide power because it supplies a well-regulated voltage and plenty of current.

Finally, the Rainbowduino can operate in one of three ways: standalone mode, serial mode, or I2C mode. The second and third allow you to stream patterns to the Rainbowduino from another microcontroller or computer. However, I want this sun to stand on its own, so I’m planning on having it run in standalone mode. This means I’ll need a way of programming it with whatever patterns I want it to use. The Rainbowduino has a 6-pin ICSP plug, which will work perfectly with the AVR programmer I already have, Lady Ada’s UsbTinyISP.

Preparation

To prepare for putting the whole display together, I wanted to test my LEDs, power supply and control board. I used an RGB driver based on a Teensy 2.0, a few FETs and a wall-wart (which I know works well with these strips) as a simple tester for the LEDs, and found no problems. The power supply also checked out, I took apart a single 4-pin plug to get the +12V and GND wires and checked the voltage with a multimeter. The reading was good and steady, but attaching it to the Rainbowduino caused one of the power-filtering capacitors to explode (which was unexpected, given the board is rated for 12V), but removing the damaged cap fixed the problem, and soon I had it powered up and lighting LEDs. I also connected the UsbTinyISP and used Avrdude to ensure I could program the Rainbowduino. (As an aside, the Avrdude part name for the ATMEGA328P is ‘m328p’, which took me way too long to figure out).

At this point I felt comfortable that I had everything I needed to put the display together (except for some sort of mounting board. However, the end of the weekend was drawing to a close, so I had to wait to get more done.

Steeling Myself

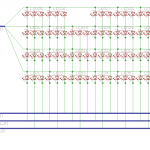
Before I prepared to cut my 3 strips into 30 smaller ones, and soldered 4 wires to each one, I decided to get a picture of what the final wiring would look like. This was a job for Cadsoft’s Eagle, the defacto-standard for making schematics and PCB layouts. Even though I’m planning on laying out the display by hand, with wires, I felt that having a reference for wiring the matrix would be worthwhile. I built a schematic to show the control layout for the LEDs, as a matrix, which is what the Rainbowduino is designed to drive. I then built a layout based on the schematic that corresponds (roughly, and not to scale) to how I’m planning to arrange the LED strips, although the footprints of all the parts are completely arbitrary. However, the pin layout of the headers on either side match the layout of those on the Rainbowduino, which will make it helpful when it comes time to connect all 120 wires.

Wiring

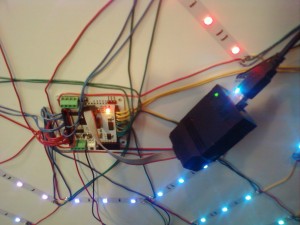
Update, May 2: I’ve now finished wiring the matrix: I attached all of the strips to a piece of foamcore board using their adhesive backing and soldered all of the connections. Everything worked on the first try, and I flashed the code (rainbowduino_v1_0_4) from here. The demo patterns looked amazing, but sadly, shortly after powering it up (before Icould even get a video), something stopped working. Not only were the patterns not being displayed, but I couldn’t get my programmer to connect to the rainbowduino! Luckily, I emailed SeeedStudio, and one of their very helpful employe has promised me that a replacement is already on the way. Hopefully it arrives before the fifth, when I was hoping to set up the display on campus. Until it arrives, and I can replace the defective board on the display, enjoy the only two photos I took while it was working (before I flashed the new firmware onto it).

Final words

Despite the setback with my Rainbowduino, I went ahead with getting the display ready for this weekend, where (hopefully) it will be sitting in a central place, entertaining people with colorful patterns. To do this, I used a large zip-tie to strap the ATX power supply to the back of the piece of foamcore board, and used some more zip ties to position all of the wires out of sight, as well as to securely fasten the two wires running 12V to the display. All in all it looks good, and I’m excited to load some exciting patters onto it once my new control board arrives.

Also, this post is still in progress — check back soon for updates! Apologies for the lack of photos, they should be coming soon.

Submit an HTML form using the enter key, without JavaScript

I was delving into some simple PHP coding for the first time in a while, and was having trouble getting a form to submit when I pressed enter. Googling was ineffective, and only seemed to come up with javascript approaches, which I wanted to avoid. However, this StackOverflow question suggested the answer: add a

hidefocus="true"

attribute to the submit button. I did this, and everything worked beautifully.

New Keyboard — Reviewed!

Have you ever had one of those days when you bought a keyboard for no good reason? Well I did the other day, and ended up with an “Irocks Chocolate Key Style Slim Keyboard for Pc with Elegant Body”. It felt like a steal — I got it $12.99 with free two day shipping.

It is now replacing an older, wireless, but more compact keyboard from the same company, which, despite serving me well, had been getting flaky in age.

Hit the jump for another picture and a review/comparison of the two keyboards

Continue reading

Update: Migratory Internet Junk

I know it’s taken me a long time to post this, but I received my box of migratory junk on May 10! I got box INTJ-7 which had been shipped out by a nice guy from San Diego. I don’t have a lot to say now (and no pictures) but I’d like to share some of what I got out of it. Perhaps my biggest find was right on top: a Hand Held Products IT4410 2D barcode scanner. On the product page I found the manual manual (pdf link) which explains all of its features.

HHP 4410HD Barcode Scanner

It turns out that the scanner emulates a PS/2 keyboard and will read almost any 1D or 2D barcode symbology. After a few hijinks with a loose ribbon cable and flaky PS/2 support on my computer I got the scanner working perfectly. I was even able to change its configuration by scanning barcodes from the manual displayed on my LCD (though I don’t know if it will work with glossy screens — mine is matte).

I’m planning on putting up a more complete summary of what I’ve found, but here are a few other things that caught my eye:

  • A solenoid-controlled proportional valve for small pneumatics or hydraulics.
  • A bag of large rubber grommets, one of which I cut up to replace the feet on a table lamp.
  • Three matched stepper motors.
  • A worm-gearbox connected to a large motor with integrated optical encoder.
  • A wide variety of IR LED/phototransistor gates.
  • A pile of 1.8V, 2.5V and 3.3V voltage regulators.

Stay tuned for pictures and more details on what I’m taking and what I’m going to do with it.